Google Analytics 4 (GA4) is the latest iteration of Google’s analytics platform. Compared to Universal Analytics, it has a better data model, uses machine learning, and is more flexible. GA4 also integrates better with web and app data, so business owners get a more holistic view of user journeys across platforms.
However, implementing a new analytics platform can feel daunting. But thanks to Google Tag Manager, the process has become simpler and easier. And that’s what we will be discussing below—how to install Google Analytics 4 with Google Tag Manager.
We’ll break down the process into simple steps, but first, let’s talk about what you need to have to proceed with installing GA4 with GTM. We’ll also talk about how to verify if GA4 is installed correctly.
Prerequisites for Installing GA4 with GTM
First things first. Here’s what you need to install GA4 on a website with GTM.
Google Analytics Account
It’s a no-brainer. You need to have a Google Analytics account to install GA4, with or without GTM. You need admin or editor privileges to configure a GA4 property. If you created the account, you will already have admin privileges.
If you do not have A Google Analytics account, you can create one here: https://analytics.withgoogle.com.
Google Tag Manager Account
Since we’ll do our setup through GTM, you need to set up your free GTM account if you don’t already have one. You can create one here: https://tagmanager.google.com/?hl=en#/home. With GTM you can add and update all of your digital marketing tags.
Website Access
If GTM isn’t already on your site, you’ll need access to your website’s code or CMS. While it can be done directly in the code, if you want a no-coding solution, many CMS platforms offer easy GTM integration plugins.
Helpful resources you might want to bookmark:
- Creating a GA4 Property: https://support.google.com/analytics/answer/9744165?hl=en
- Setting Up GTM: https://support.google.com/tagmanager/answer/6103696?hl=en
Setting Up GA4 with GTM
This is a 3-step process.
Step 1: Create GA4 Property and Data Stream
Step 2: Install GTM on Your Website (if you don’t already have it)
Step 3: Configure GA4 Tag in GTM
Step 1: Create GA4 Property and Data Stream
You have one GA4 Property for one domain and the Data Stream is the pipe that connects your website or app to your property. Each data stream represents a single source of data, like your website or a specific mobile app.
To build your GA4 property, follow these steps:
1. Head to Google Analytics: https://analytics.google.com/analytics/web/#. Login from the Google account you want to associate with the GA4 account.
2. Click “Admin” in the bottom left corner.
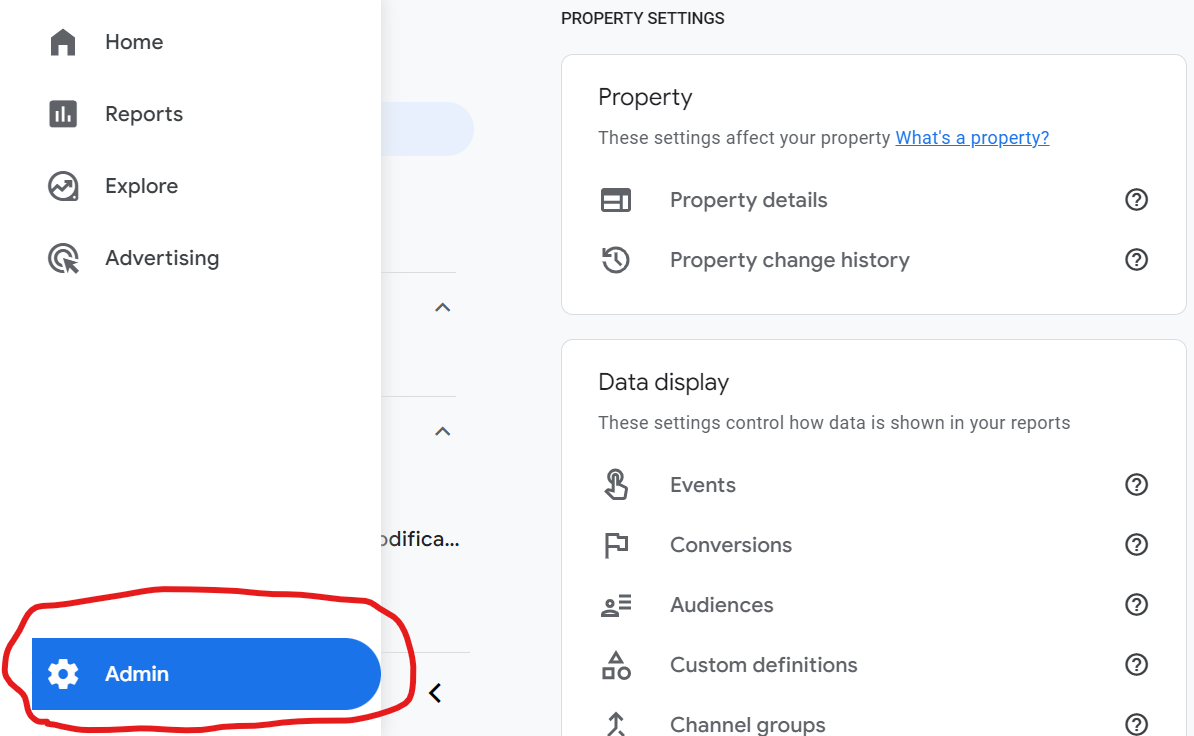
3. Under the “Property” column, click “Create Property”.

4. Fill out the details, such as the property name. In the next section, input your business information, such as industry, business size, etc. Hit “Create,” and the property is born.
Now, set up the data stream.
5. Since we are doing it for a website, choose “Web” as your property type.
Enter your website URL and a stream name.
6. Click on “Create stream”.
7. Enable Enhanced Measurement (optional). This automatically tracks key user interactions without needing manual code changes.
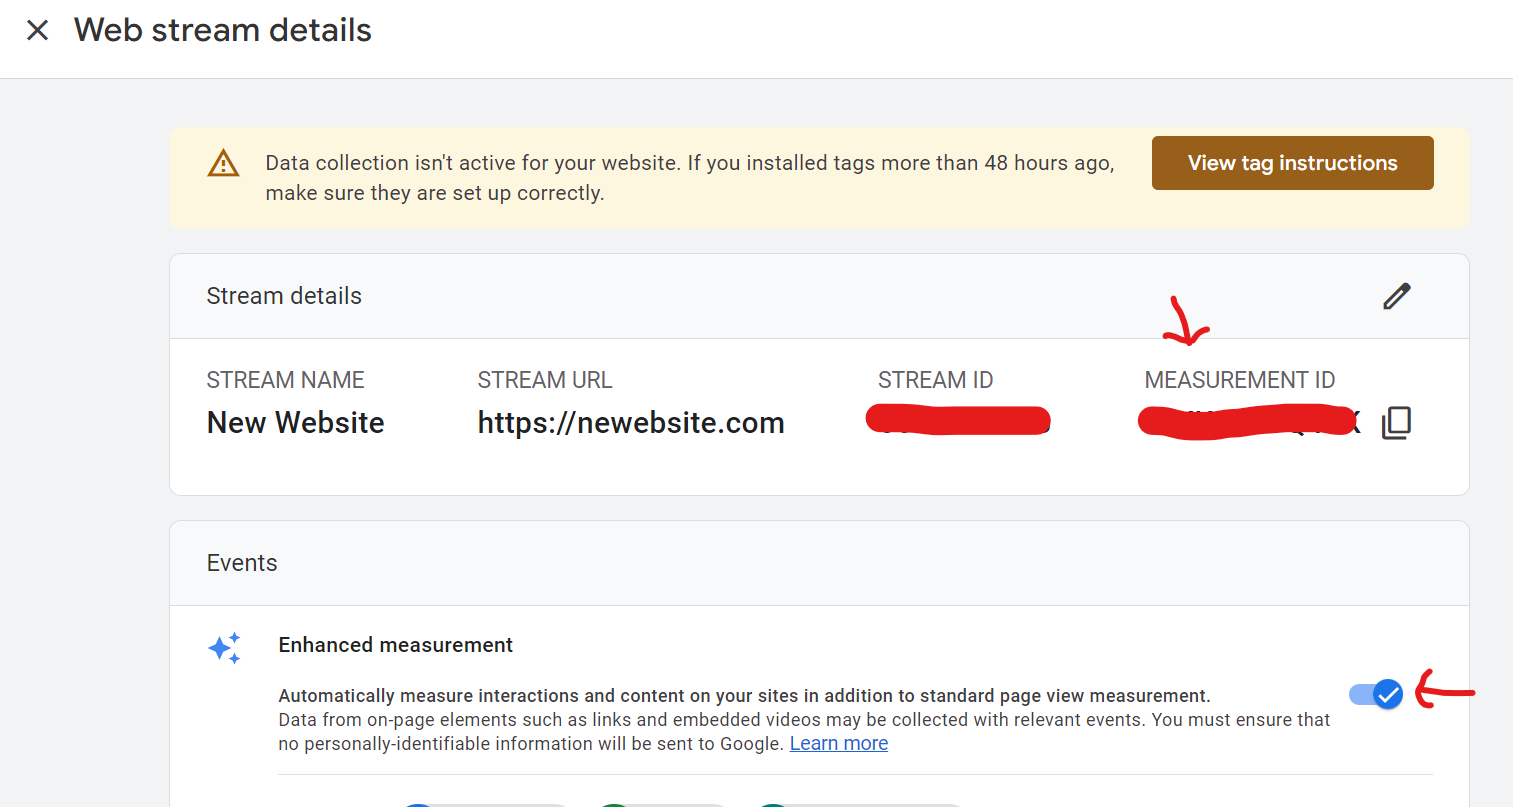
Remember to note down your measurement ID.
What’s a GA4 Measurement ID? This unique identifier is like your GA4 property’s address. You’ll need it for configuring GTM later.
With your GA4 property and data stream setup, you’ve done the basic work of your GA4 + GTM analytics setup. Now, let’s discuss how to install GTM on your site and start tracking user interactions.
However, if you already have GTM on your website, you can skip this step and move on to step 3.
Step 2: Install GTM on Your Website (if you don’t already have it)
Now that your GA4 property and data stream are ready to capture data, it’s time to introduce GTM as your tag manager. There are two primary methods for installing GTM on your website:
Method 1: Manual Code Injection (for those comfortable with website code)
1. Access Your GTM Container Code:
- Log in to your GTM account.
- Create a new container for your website and give it a descriptive name.
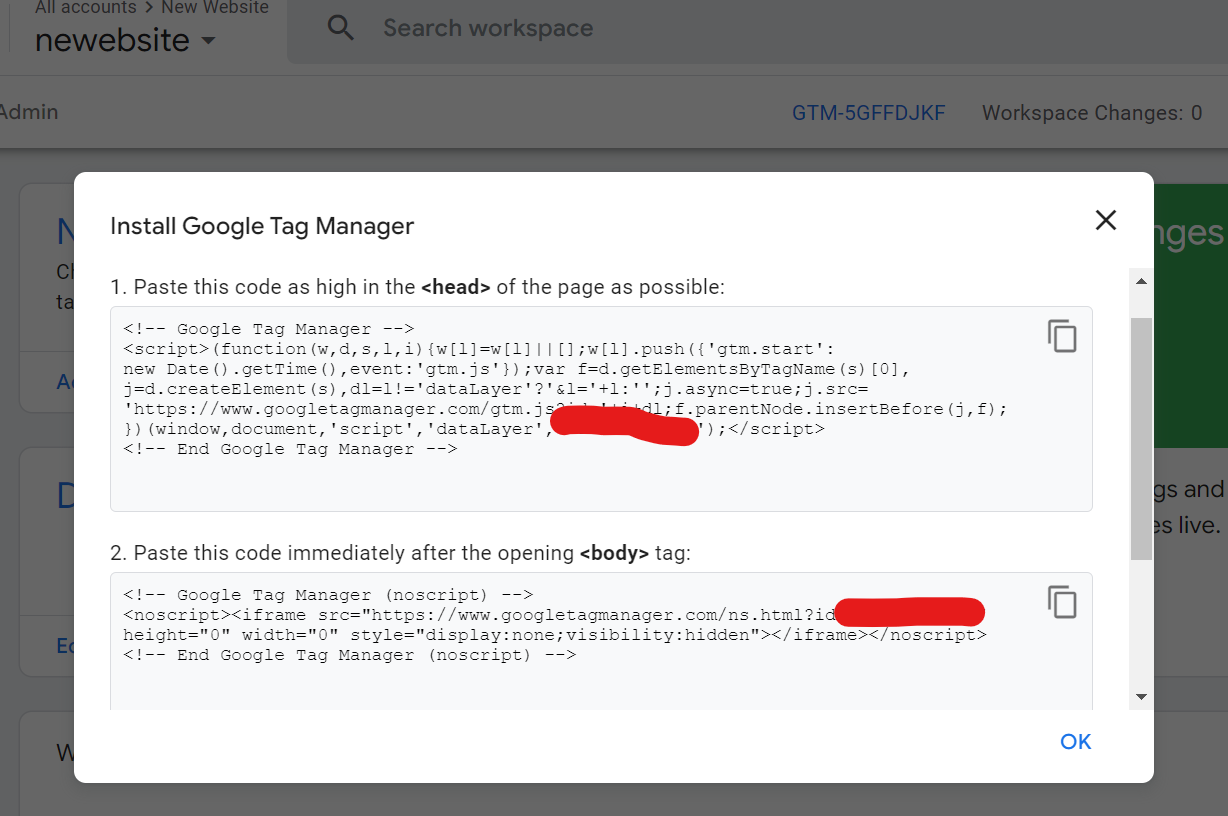
- Click “Create,” and you’ll receive two code snippets.
 2. Paste the First Snippet in the <head> Section of your website.
- Open your website’s code editor or access the header template in your CMS—in WordPress, you will find this in the “Appearance” and then “Theme file editor.”
- Paste the first GTM code snippet immediately after the opening <head> tag.
3. Paste the Second Snippet After the Opening <body> Tag:
- Find the opening <body> tag in your website’s code.
- Paste the second GTM code snippet right after it.
4. Publish Your Changes
- Save the code changes and publish them to your live website.
If you don’t want to interfere with your website’s code, you can do it through a plugin.
Method 2: Using a Plugin (for CMS users)
Most CMS, like WordPress, Shopify, and Wix, have extensions you can use to set up GTM. Search for the relevant plugin in your CMS’s plugin directory and follow the installation instructions. Usually, you just need to provide your GTM container ID, and the plugin will handle the code insertion for you.
Step 3: Configure GA4 Tag in GTM
Now that you have installed GTM, it’s time to create the link between your website and your GA4 property. Here’s how to create the GA4 Configuration tag in GTM:
- Enter the GTM Workspace—log in to your GTM account and access the container for your website.
- Create a New Tag—click “New” and choose “Tag” from the menu.
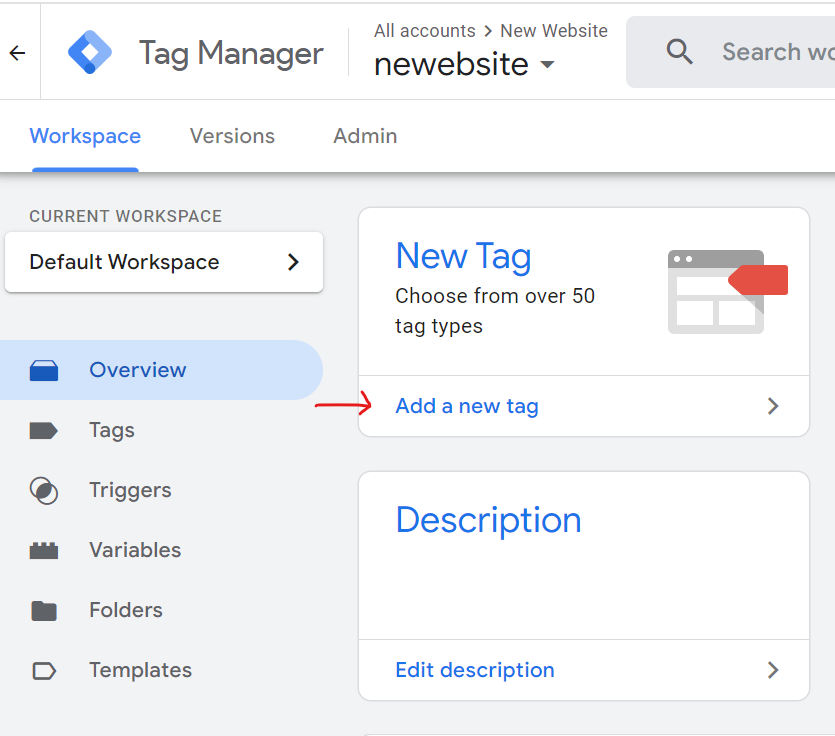
- Select Tag Type—click on “Choose a tag type to begin setup…” In the Featured section, click on “Google Tag”. This is confusing because there’s a GA4 event tag in the list too but we don’t want to use that right now. GA4 uses the Google Tag to send pageviews and that’s the one we want.
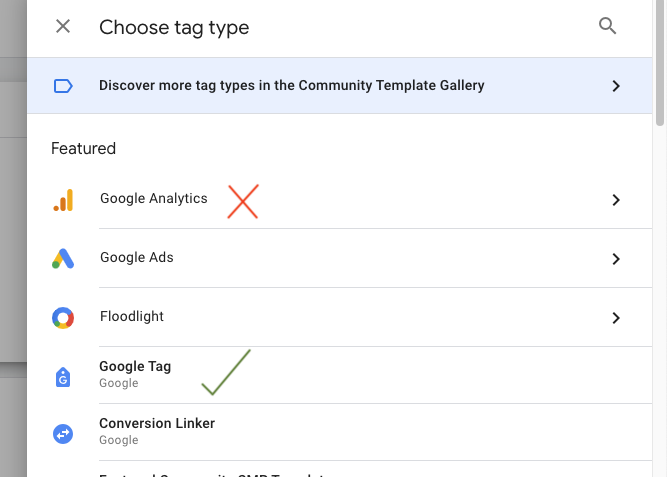
- Enter Measurement ID—Remember that unique address for your GA4 property? It’s time to use it! If you have already saved it, put that ID in the box. If not saved, retrieve it from the GA4 data stream settings. Paste it into the “Measurement ID” field within the tag configuration, as shown below:

- Configure Triggers—triggers determine when the tag fires, sending data to GA4. Scroll down to “Triggering” and click on “Choose a trigger to make this tag fire…” For basic tracking, choose the “All Pages” trigger to send data on every pageview.

Save and Publish—click “Save” and then “Submit” to send your changes to the GTM preview environment.
Publish your changes to push them live to your website.
Done? Congratulations! You’ve successfully connected GA4 with your website through GTM. But how do you know if it is working? Let’s verify what we have done so far.
Verify and Test GA4 Tracking
Now that you’ve configured your GA4 + GTM setup, it’s time for the moment of truth—to verify and test your tracking and to see if everything is working as planned.
Here are 3 ways to test if data is flowing:
Method 1: Real-time Reports
- Open Google Analytics: https://analytics.google.com/analytics/web/#
- Navigate to your GA4 property: Select the relevant property you set up earlier.
- Go to “Reports” and then “Real-time”.
- Open a new browser tab and visit your website. Take some actions, such as viewing a page, etc.
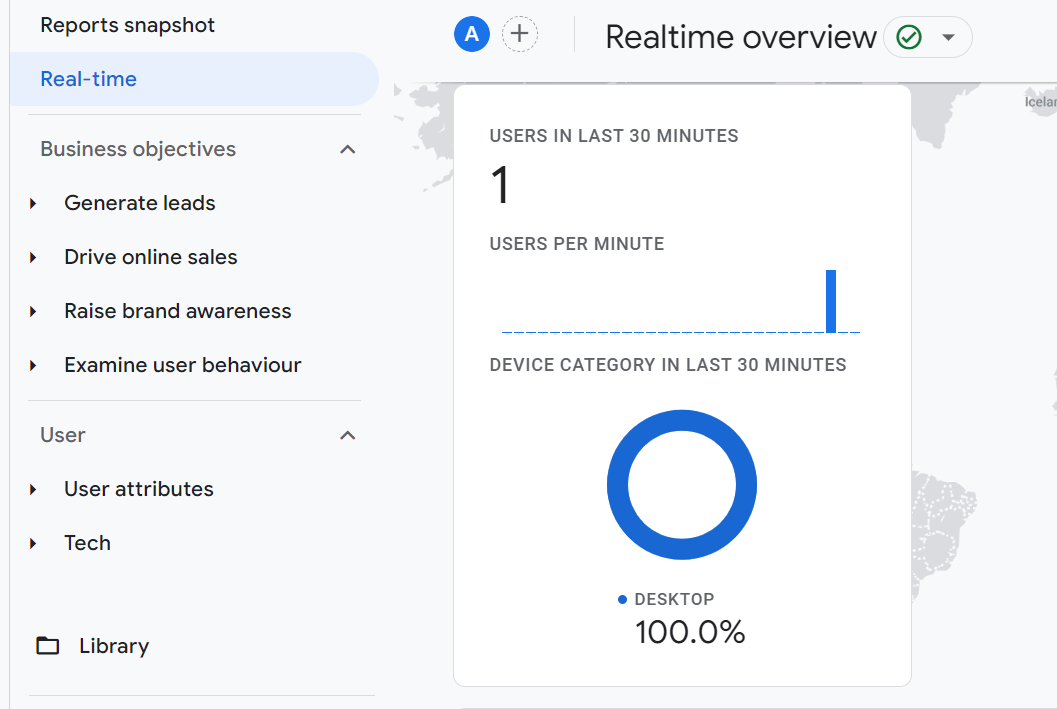
- Switch back to the Real-time report and watch for an entry with details corresponding to your visit. Check if the number of users has increased, as well as the device information, location, and other events, which you will find by scrolling down. If you think it is you, it’s done! If it’s a new website, you may just see one user in the Real-Time Report, as shown below:
Method 2: Preview Tool in GTM
- In your GTM workspace, click on the preview button (in the top right corner).
- Enter the URL of your website and click “Start.”
- A new tab (or window) will open with your website.
- It should say “Connected!”
- As you navigate and interact with your website, you will see events appearing in the Preview console.
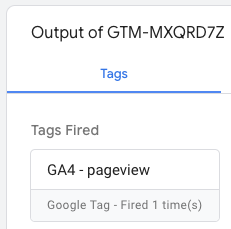
- Look for the Google Tag you created to show up in the Tags Fired section.
Method 3: Google Tag Assistant
- Install the “Google Tag Assistant Companion” Chrome extension. Set it up—put your website details and then click on “Connect.”
- Open your website with the extension active.
- Click on any element you suspect should trigger a tag (e.g., viewing a page, clicking on a button, or submitting a form).
- It should say, “Google tag found.”
- The extension will also show you a detailed breakdown of the tags that fired, including the GA4 Configuration tag. See the “Summary” on the left side and “Output of ….” down below. See the image below:
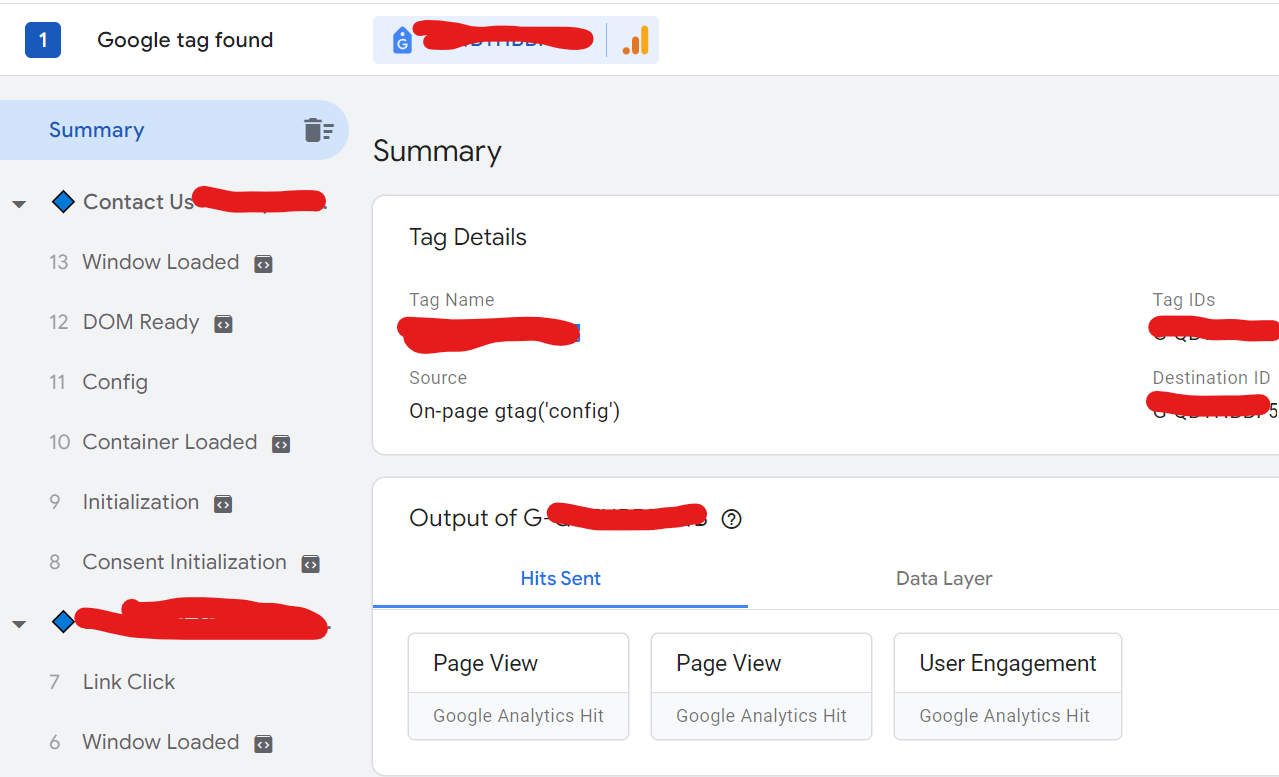
This helps you verify if your triggers are configured correctly and your events are being tracked as intended.
If you’re still having problems:
- Verify Placement of GTM code: Double-check that the GTM code snippets are placed correctly in the <head> and <body> sections of your website’s code.
- Check for GTM Errors: Use the Google Tag Assistant Chrome extension to find errors in your GTM installation.
- Clear Cache: Clear your browser cache and cookies to ensure you’re viewing the most recent version of your website.
If you’re still having problems and need an expert to review, we might be able to help. Send an email to brian@dataled.co
 All posts


